
The time has come to move your iTunes data. For whatever reason, your situation calls for a transfer of data from PC to Mac. In this how to we’ll show you how to transfer your iTunes library to a Mac from a PC and still retain your playlists, ratings and other data.

What You’ll Need
We are basing this article on iTunes 10, so make sure you are running that version or newer before starting.
If you have a huge library then you’ll need an external hard drive to copy your data to. If the iTunes library is a modest one then a flash drive will likely do.
An alternative to purchasing external hardware is to setup a network connection between the two computers. The setup of such a network is beyond the scope of this article, but if you’ve already got one setup then you can move the files easily with a shared folder.
On the PC Side
Connect your external device (hard drive or flash drive) to the PC. A few items need to be checked off to ensure the library is copied in its entirety.
- Click Edit and select ‘Preferences’.
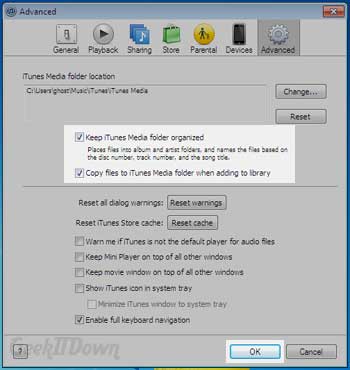
- Click the ‘Advanced’ tab.
- Check ‘Keep iTunes Media folder organized’ and ‘Copy files to iTunes Media folder when adding to library’.
- Click ‘OK’.
- Click File and select ‘Library’, then ‘Organize Library’.
- Check ‘Consolidate files’.

- Click ‘OK’.
Now copy the iTunes folder to your external hard drive, flash drive or over your network. The iTunes folders will be in slightly different locations depending on your version of Windows.
[list type=bullet]
- 7: <username>\My Music\iTunes
- Vista: <username>\Music\iTunes
- XP: Documents and Settings\<username>\My Documents\My Music\iTunes
[notice type=”blue”]Note: <username> indicates your login/username on the Windows PC.[/notice]
On the Mac Side
Now connect the external device (hard drive or flash drive) to your Mac. If you have not yet saved music to your Mac through iTunes, then simply copy the iTunes folder from your external device to your Mac replacing the empty folder at /Users/<username>/Music/iTunes.
If you have already started saving music on your Mac, then you’ll need to move the music out of the /Users/<username>/Music/iTunes folder before copying the PC data over. After the transfer of data from PC to Mac is complete, simply add those files back into the iTunes library.
- Move the ‘Music’ folder which is located in the iTunes folder to another location.
- After transfer, click ‘File’ and select ‘Add File to Library’
- Navigate to where you moved the Music folder and add your Mac songs back in.
After the copy process is complete, launch iTunes. The Mac should read the data and load everything as it was.
Final Thoughts
The process can seem daunting at first, but don’t be discouraged. The process is basically copying from one system to another with a few checks and balances in between. If you store your music in a location other than the default, you’ll need to copy your music/media folder into your iTunes folder on the backup device before transferring it to the Mac.
If you enjoyed or found this article useful please show us some support by sharing us on your favorite social websites. Thanks!
Your Thoughts
Did this method of transfer work for you? Is there another way you’d like to share? Let us know in the comments!